How to create a fullstack application using Django and Python Part 1
Social Share:
Monday, August 26, 2024 at 10:48 AM | 9 min read
Last modified on Thursday, July 16, 2026 at 11:48 AM
#django, #fullstack development, #grep, #pipe, #homebrew, #macOS, #pyenv, #pyenv local, #python3, #virtualenv, #series

Photo by David Clode on unsplash.com
This series is based on a series entitled A Complete Beginner's Guide to Django by Vitor Freitas on his website simpleisbetterthancomplex.com/ from some years ago. I have made updates to outdated code/content, added features, and am making some changes and additions to the structure, functionality, and design. It is thanks to him that I learned a lot I did not learn anywhere else about Django! Check it out to compare what he did in his series and development sequence compared to mine. I hope you will enjoy building this project. I know I have!
Important Note: Before committing anything to Git or pushing anything to remote, please visit How to create a fullstack application using Django and Python Part 4 where I discuss how to add the python-dotenv package to the Django site and why it is crucial to do it. This article assumes you have a working knowledge of Git.
Table of Contents
- So why Django over other fullstack formats or frameworks?
- So what is Django?
- The Django Boards project
- Setting up the project
- Selecting a Python interpreter inside your favorite IDE
- Installing virtualenv
- Installing Django
- Conclusion
- Related Resources
- Related Posts
Update (July 2026): This walkthrough was written against Django 5.1, which reached full end-of-life in December 2025 and is no longer receiving security patches. Run python -m django --version to check which version you have.
I wrote this series as a live process, so sometimes it might seem confusing, but it all works out in the end.
So why Django over other fullstack formats or frameworks?
I come from fullstack JavaScript. That means JavaScript (including React, ejs, npm, node.js, express.js, next.js, etc.), HTML, and CSS. I also have worked with WordPress, which is large and extensive by default, as well as expensive to maintain and host if done right. I loved working with Node.js, npm, and JavaScript/React, but there were use cases where it just was not optimal. Sometimes I just wanted to build an all-inclusive fullstack application quickly and securely. That's where Django comes in.
So what is Django?
According to the Django website,
Django is a high-level Python web framework that encourages rapid development and clean, pragmatic design.
Django makes it easier to build better web apps more quickly and with less code.
Django was designed to help developers take applications from concept to completion as quickly as possible.
Django takes security seriously and helps developers avoid many common security mistakes.
Some of the busiest sites on the web leverage Django’s ability to quickly and flexibly scale.
The Django Boards project
I recently started building an application with Django called Django Boards. Happy to be building a fullstack application again, and to be working with (Python) Django.
Setting up the project
Creating the project directory
First, I created the Django Boards directory where I would house the application and from which to deploy it to GitHub. I already had a folder dedicated to Django and Python projects called python-development, and I created a new directory inside called django-boards:
# inside Python-Development directory inside /Users/mariacam
mkdir django-boards
The directory structure
/Users/mariacam
  - /django-boards
Installing pyenv with Homebrew
Just like I like to install and manage versions of Node.js with NVM (Node Version Manager), I like to install and manage versions of Python with pyenv.
pyenv allows you to easily switch between different versions of Python, which can be useful for compatibility testing or for using different versions of Python for different projects.
Some of the key features of pyenv are:
- Manage multiple versions of Python, including different implementations (e.g., CPython, PyPy).
- Install new Python versions easily.
- Set global and local (per-project) Python versions.
- Use virtual environments more effectively in conjunction with tools like pyenv-virtualenv.
To install pyenv with Homebrew, run the following command(s) in Terminal:
brew update && brew install pyenv
To make sure that you actually have pyenv installed, run the following in Terminal:
pyenv --version
If you get back a version, then you know that you have successfully installed it. You could also run the following to make sure you have pyenv successfully installed after installation:
echo '# exit code:' $?
# which returns:

# exit code: 0
And if 0 is returned, then you know that it has been successfully installed.
I had to run the following command to install the macOS-Homebrew-specific Python build dependencies:
brew install openssl readline sqlite3 xz zlib
Originally, I had installed Python via python.org's official installation as well as Homebrew and pyenv.
I previously installed Python 3.8.2 and 3.8.3 with pyenv. I installed python@3.12 with Homebrew. I downloaded and installed Python 3.11 and 3.12 from python.org. I moved the two python.org installs to the trash. I later found that I had to keep the python@3.12 Homebrew install. When I tried to uninstall it with the brew uninstall python@3.12 command, the following was returned in Terminal:
`Error`: Refusing to uninstall /opt/homebrew/Cellar/python@3.12/3.12.5
because it is required by cairo, gdk-pixbuf, glib, harfbuzz, librsvg and pango, which are currently installed.
You can override this and force removal with:
  brew uninstall --ignore-dependencies python@3.12
Working with Python alone was not a problem. Getting pyenv to work properly was a bit of a problem. Getting my Django install and application to work was also a bit of a challenge. What got the whole thing started was changing my Django project name midstream. I will discuss what I did to fix this later on.
Fixing the pyenv install
-
I got rid of versions of Python I had installed via python.org which resided in the Applications folder so that there would be no potential conflicts between Python versions installed via python.org and those installed via Homebrew or pyenv.
-
I uninstalled pyenv with the brew uninstall pyenv command, and then re-installed it with the brew install pyenv command.
-
I made sure that pyenv was in PATH. I added the following to the bottom of my .zshrc file:
export PYENV_ROOT="$HOME/.pyenv"
export PATH="$PYENV_ROOT/bin:$PATH"
if command -v pyenv 1>/dev/null 2>&1; then
  eval "$(pyenv init -)"
fi
-
I ran exec $SHELL to start a new zsh session in Terminal.
-
I could have run pyenv install --list to see what versions of Python were available via pyenv, but the list is incredibly long. So I went with filtering for Python-specific versions with the following command instead:
pyenv install -l | grep '^ [0-9]'
Which returned:
2.1.3
  2.2.3
  2.3.7
  2.4.0
  2.4.1
  2.4.2
  2.4.3
  2.4.4
  2.4.5
  2.4.6
  2.5.0
  2.5.1
  2.5.2
  2.5.3
  2.5.4
  2.5.5
  2.5.6
  2.6.0
  2.6.1
  2.6.2
  2.6.3
  2.6.4
  2.6.5
  2.6.6
  2.6.7
  2.6.8
  2.6.9
  2.7.0
  2.7-dev
  2.7.1
  2.7.2
  2.7.3
  2.7.4
  2.7.5
  2.7.6
  2.7.7
  2.7.8
  2.7.9
  2.7.10
  2.7.11
  2.7.12
  2.7.13
  2.7.14
  2.7.15
  2.7.16
  2.7.17
  2.7.18
  3.0.1
  3.1.0
  3.1.1
  3.1.2
  3.1.3
  3.1.4
  3.1.5
  3.2.0
  3.2.1
  3.2.2
  3.2.3
  3.2.4
  3.2.5
  3.2.6
  3.3.0
  3.3.1
  3.3.2
  3.3.3
  3.3.4
  3.3.5
  3.3.6
  3.3.7
  3.4.0
  3.4-dev
  3.4.1
  3.4.2
  3.4.3
  3.4.4
  3.4.5
  3.4.6
  3.4.7
  3.4.8
  3.4.9
  3.4.10
  3.5.0
  3.5-dev
  3.5.1
  3.5.2
  3.5.3
  3.5.4
  3.5.5
  3.5.6
  3.5.7
  3.5.8
  3.5.9
  3.5.10
  3.6.0
  3.6-dev
  3.6.1
  3.6.2
  3.6.3
  3.6.4
  3.6.5
  3.6.6
  3.6.7
  3.6.8
  3.6.9
  3.6.10
  3.6.11
  3.6.12
  3.6.13
  3.6.14
  3.6.15
  3.7.0
  3.7-dev
  3.7.1
  3.7.2
  3.7.3
  3.7.4
  3.7.5
  3.7.6
  3.7.7
  3.7.8
  3.7.9
  3.7.10
  3.7.11
  3.7.12
  3.7.13
  3.7.14
  3.7.15
  3.7.16
  3.7.17
  3.8.0
  3.8-dev
  3.8.1
  3.8.2
  3.8.3
  3.8.4
  3.8.5
  3.8.6
  3.8.7
  3.8.8
  3.8.9
  3.8.10
  3.8.11
  3.8.12
  3.8.13
  3.8.14
  3.8.15
  3.8.16
  3.8.17
  3.8.18
  3.8.19
  3.9.0
  3.9-dev
  3.9.1
  3.9.2
  3.9.4
  3.9.5
  3.9.6
  3.9.7
  3.9.8
  3.9.9
  3.9.10
  3.9.11
  3.9.12
  3.9.13
  3.9.14
  3.9.15
  3.9.16
  3.9.17
  3.9.18
  3.9.19
  3.10.0
  3.10-dev
  3.10.1
  3.10.2
  3.10.3
  3.10.4
  3.10.5
  3.10.6
  3.10.7
  3.10.8
  3.10.9
  3.10.10
  3.10.11
  3.10.12
  3.10.13
  3.10.14
  3.11.0
  3.11-dev
  3.11.1
  3.11.2
  3.11.3
  3.11.4
  3.11.5
  3.11.6
  3.11.7
  3.11.8
  3.11.9
  3.12.0
  3.12-dev
  3.12.1
  3.12.2
  3.12.3
  3.12.4
  3.12.5
  3.13.0rc1
  3.13.0rc1t
  3.13-dev
  3.13t-dev
  3.14-dev
  3.14t-dev
This command redirects the pyenv install -l command as stdin to grep '^ [0-9]'. In other words, the command lists all the available Python versions available for install using pyenv, but it filters the list to only return versions that begin with a number. Those versions represent Python versions.
pyenv install -l lists all the versions of Python available for install using pyenv.
The | (pipe) shell operator takes the output of pyenv install -l and uses it as stdin of grep '^ [0-9]'.
grep '^ [0-9]' filters the (pyenv install -l) list to display only lines that begin with two spaces (beginning represented by ^) and followed by a digit (represented by [0-9]). That is all that's needed, because the rest of the versions that are returned begin with an alpha character.
-
I decided to go with Python3 version 3.12.5, and installed it with the pyenv install 3.12.5 command. However, when I ran python3 --version, Python 3.8.3 was still returned.
-
I ran the pyenv local 3.12.5 command, and then ran python3 --version. This time Python 3.12.5 was returned!
Determining which versions of Python have been installed with pyenv
If I wanted to figure out which versions of Python I had installed with pyenv, I could run the following command in Terminal:
ls ~/.pyenv/versions/
Which in my case returns:
3.12.5 3.8.2 3.8.3
Each Python version that is installed with pyenv is located in the .pyenv root directory (~/.pyenv/versions/). And pyenv builds Python from source. For example, if I run the command cd .pyenv/versions/ from my home directory, the following is returned:
~/.pyenv/versions git: (master)
pyenv builds Python from its remote Git repository as indicated by git: (master).
This was very helpful in figuring out how I had installed Python 3.8.3 so that I would know how to update Python from 3.8.3 to 3.12.5.
The pyenv local command
The pyenv local command sets the local Python version to be used in the current directory and all directories underneath it. It writes the version name to a file named .python-version in the current directory. This local version takes precedence over the global version set by pyenv global.
I ran pyenv local 3.12.5 in /Users/mariacam, my home directory. I did this so that all other directories and subdirectories within the home directory would all inherit this command. And they did.
Selecting a Python interpreter inside your favorite IDE
Before installing virtualenv, I select a Python interpreter in Visual Studio Code. There are many interpreters to choose from:
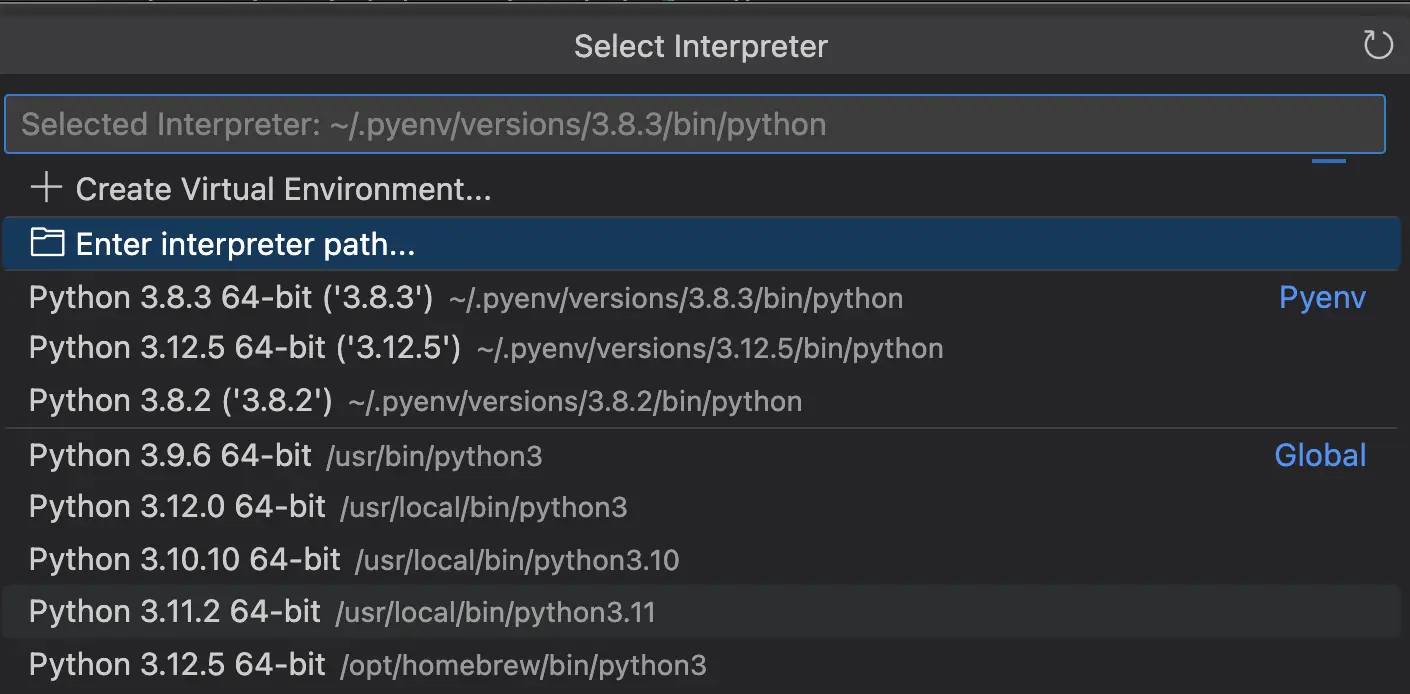
Screenshot of Python interpreters available in Visual Studio Code
Since I am using Python 3.12.5 installed with pyenv, I selected the Python 3.12.5 interpreter installed with pyenv (~/.pyenv/versions/3.12.5/bin/python).
Installing virtualenv
Next, I used pip to install virtualenv.
pip is the package installer for Python. It allows you to install and manage libraries and dependencies that are not part of the Python standard library. With pip, you can find, install, upgrade, and uninstall Python packages.
Some essential pip commands include:
- pip install <package-name>: To install a package
- pip uninstall <package-name>: To uninstall a package
- pip list: To list installed packages
- pip show <package-name>: To display information about a particular package
To install virtualenv, I ran the pip3 install virtualenv. I made sure that I installed virtualenv at the root of my Django project. Revisiting the directory structure:
/Users/mariacam
  - /django-boards # this is the project root directory where I install virtualenv
pip3 is similar to pip but specifically for Python 3.x versions. It is the package installer for libraries and dependencies in Python 3 environments. This helps distinguish between Python 2 packages and Python 3 packages on systems where both versions are installed.
pip3 is installed with Python 3x versions.
What is virtualenv?
virtualenv is a tool for creating isolated Python environments. It allows you to create a self-contained directory that contains a Python installation and packages, isolated from other Python environments on a system. This is useful for managing project-specific dependencies and avoiding conflicts between different projects.
Creating a virtual environment for the Django application
Once I installed virtualenv with pip3, I had to create my Django Boards application virtual environment, so I ran the virtualenv venv -p python3 command and the result was the following:
/Users/mariacam
  - /django-boards # this is the project root directory where I install virtualenv
    - /venv
To create a virtual environment with the virtualenv command, I ran the following in Terminal:
virtualenv venv -p python3
The virtualenv venv -p python3 command creates a new virtual environment named "venv" and specifies that it should use Python 3.x as the Python interpreter. It is common practice to name the virtual environment "venv".
- virtualenv is the command for creating a new virtual environment.
- "venv" is the name of the directory where the virtual environment is created.
- the -p python3 option specifies the Python interpreter to use for the virtual environment. In this case, it is set to use Python 3.x.
Activating the virtual environment
To activate the virtual environment I just created, I ran the source venv/bin/activate command. This command is used to activate a virtual environment in Unix-like systems such as Linux and macOS.
- source is a built-in shell command that reads and executes commands from a file in the current shell session.
- venv/bin/activate is the path to the "activate" script in the virtual environment directory (if the virtual environment is actually named "venv").
- The "activate" script sets up the environment variables needed to use the virtual environment.
When you run source venv/bin/activate, it modifies your shell session to use the Python interpreter and libraries located in the "venv" directory instead of the system-wide Python installation. The command prompt changes to indicate that you are now working within the virtual environment. For example, when I activate my "venv" virtual environment, my command prompt changes to the following:
(venv) mariacam@Marias-MBP ~/Python-Development/django-boards main ●
(venv) is added to the beginning of the command prompt.
Deactivating the virtual environment
In order to deactivate the virtual environment, I run the following command in Terminal:
deactivate
Since I was going to continue working on Django Boards, I did not deactivate it. My virtual environment needs to be activated in order to be able to develop my Django application.
Installing Django
To install django in my Django application, I run the following command at the root of the Django Boards project (/django-boards):
pip3 install django
And the following is returned in Terminal:
Collecting django
  Using cached Django-5.1-py3-none-any.whl.metadata (4.2 kB)
Collecting asgiref<4,>=3.8.1 (from django)
  Using cached asgiref-3.8.1-py3-none-any.whl.metadata (9.3 kB)
Collecting sqlparse>=0.3.1 (from django)
  Using cached sqlparse-0.5.1-py3-none-any.whl.metadata (3.9 kB)
Using cached Django-5.1-py3-none-any.whl (8.2 MB)
Using cached asgiref-3.8.1-py3-none-any.whl (23 kB)
Using cached sqlparse-0.5.1-py3-none-any.whl (44 kB)
Installing collected packages: sqlparse, asgiref, django
Successfully installed asgiref-3.8.1 django-5.1 sqlparse-0.5.1
Now I am ready to continue developing my Django application!
Conclusion
In this section, I create the project directory, install pyenv with Homebrew, install Python 3.12.5 with pyenv, execute the pyenv local command, install virtualenv and create a virtual environment, activate and deactivate the environment, and install Django.
Related Resources
A Complete Beginner's Guide to Django: by Vitor Freitas
- Create a project environment for the Django tutorial: Visual Studio Code docs