How to create a fullstack application using Django and Python Part 2
Social Share:
Tuesday, August 27, 2024 at 9:41 AM | 3 min read
Last modified on Saturday, July 11, 2026 at 2:40 PM
#macOS, #django, #fullstack development, #python3, #django project, #runserver, #series

Photo by David Clode on unsplash.com
Important Note: Before committing anything to Git or pushing anything to remote, please visit How to create a fullstack application using Django and Python Part 4 where I discuss how to add the python-dotenv package to the Django site and why it is crucial to do it. This article assumes you have a working knowledge of Git.
Table of Contents
- Creating a project in the Django web application
- The new Django Boards structure including the django_boards project
- Starting up the Django development server
- Conclusion
- Related Resources
- Related Posts
- Footnotes
Update (July 2026): This walkthrough was written against Django 5.1, which reached full end-of-life in December 2025 and is no longer receiving security patches. Run python -m django --version to check which version you have.
I wrote this series as a live process, so sometimes it might seem confusing, but it all works out in the end.
Creating a project in the Django web application
To create (start) a new project in my Django application, I run the following command at the root of the Django application (/django-boards) where the "venv" folder resides:
django-admin startproject django_boards
The command line utility django-admin comes bundled with Django and handles admin tasks like starting a project or creating a new app.
The django-admin script should be on your system path if you installed Django via pip31. If it’s not in your path, make sure you have your virtual environment activated.
Django must be installed globally for django-admin to be accessible from anywhere on your system. I did install Django with Homebrew as well, so I do have access to django-admin outside the Django application itself.
The new Django Boards structure including the django_boards project
With the addition of the django_boards project inside the "django-boards" directory, the "django-boards" root directory now contains the following:
/django-boards # high level Django application folder for Django project(s) and app(s)
  - /django_boards # root folder of the django_boards project
    - /django_boards # folder of the django_boards project/package
      - __init__.py # file
      - asgi.py # file
      - settings.py # file
      - urls.py # file
      - wsgi.py # file
    - manage.py # file
  - /venv # folder
- manage.py is automatically created in each Django project, and it does the same thing as django-admin. However, it also sets the DJANGO_SETTINGS_MODULE environment variable so that it points to your project’s settings.py file. I will be using manage.py to run the development server, tests, create migrations, and more.
- __init__.py initializes the django_boards package. It is an empty file and tells Python that the folder it resides in is a package.
- asgi.py2 is created by the startproject command. It is not used by the development server (runserver), but can be used by any ASGI server either in development or in production.
- settings.py contains all the project's configurations.
- urls.py is responsible for mapping the routes and paths in my project. If I want to display something in a particular URL, I first have to map it here.
- wsgi.py3 is a simple gateway interface used for deployment.
Starting up the Django development server
Django comes with a simple development server. To start up this development server, I run the following command in Terminal:
python3 manage.py runserver
The first time that python3 manage.py runserver is run, Terminal returns the following:
You have unapplied migrations; your app may not work properly until they are applied.
Run 'python manage.py migrate' to apply them.

August 22, 2024 - 15:50:53
Django version 5.1, using settings 'django_boards.settings'
Starting development server at http://127.0.0.1:8000/
Quit the server with CONTROL-C.
Ignore the warning about unapplied database migrations for now. I will deal with it shortly.
Now I can check out my Django application in the browser at http://127.0.0.1:8000/. It should look something like the following:
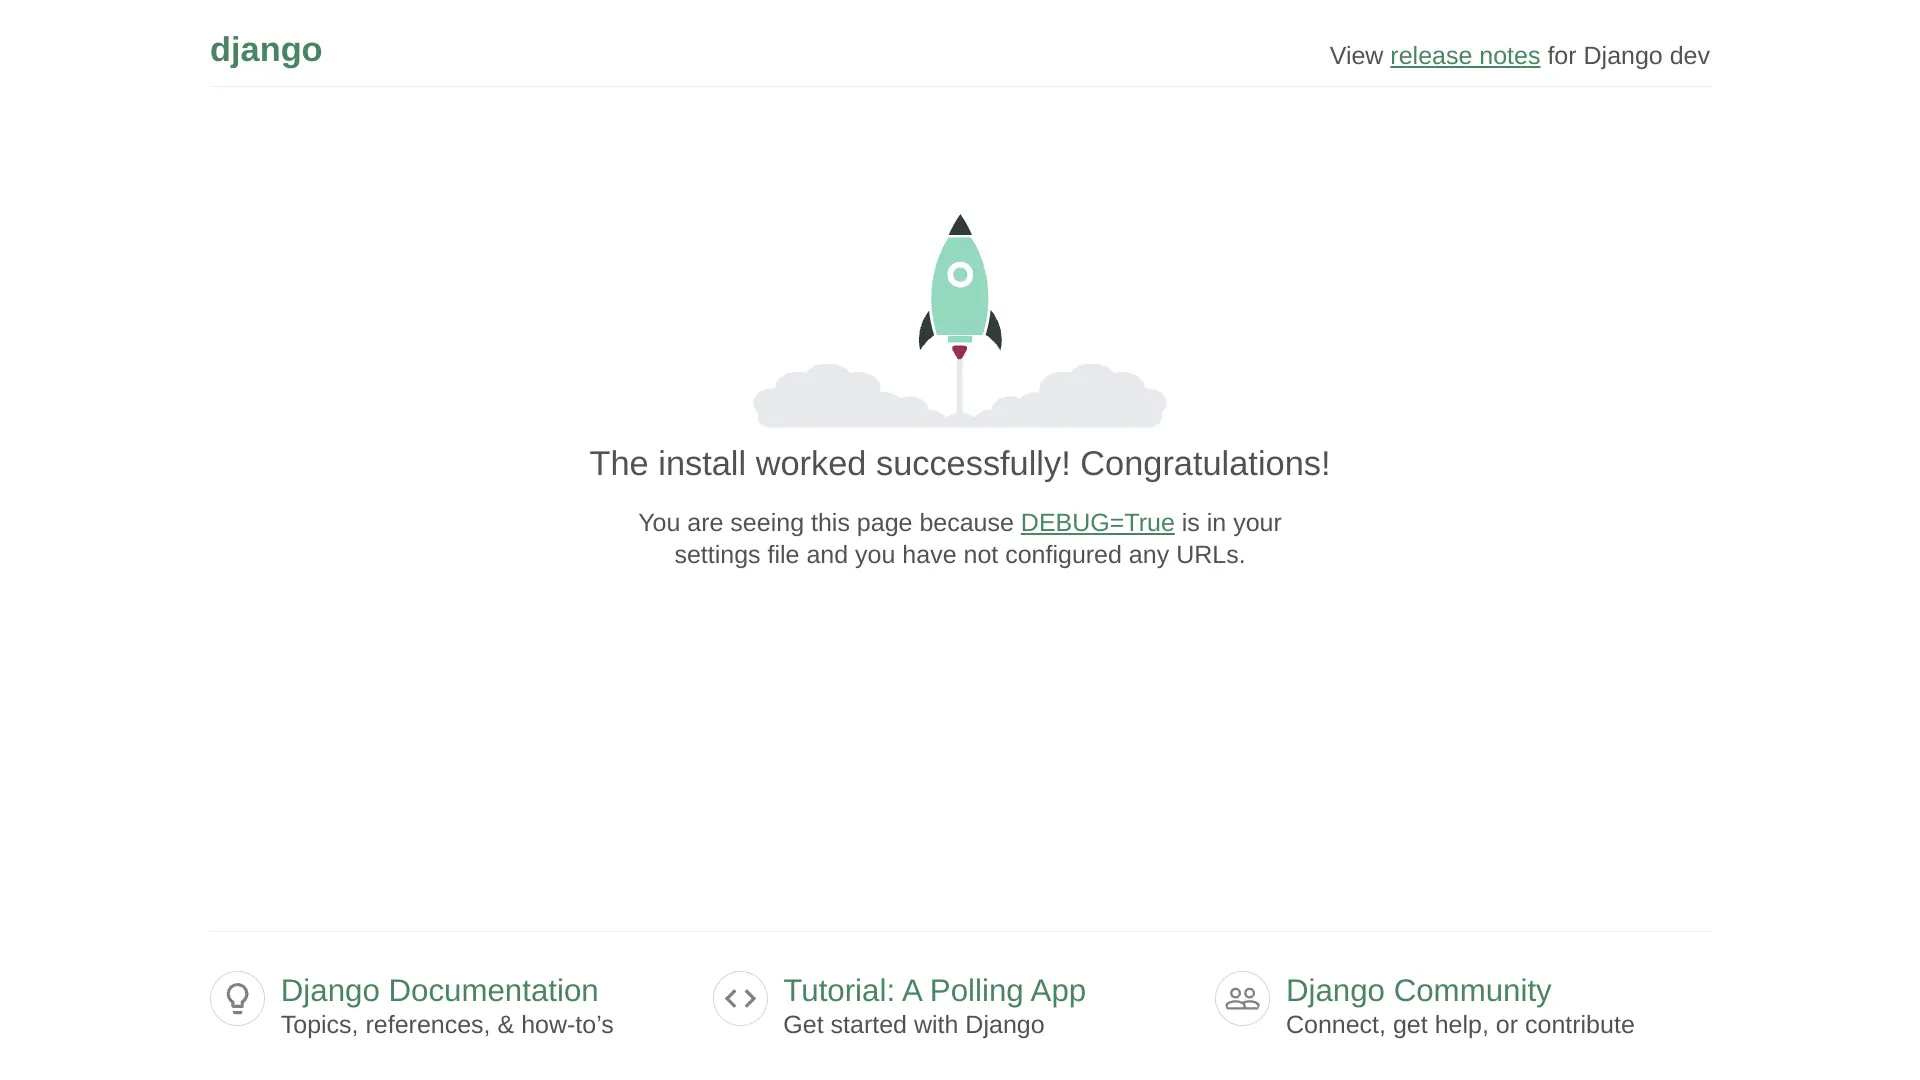
Running the Django development server
In the next section, I will be creating a Django app, and will discuss the two central Django concepts, project and app, in further detail.
Conclusion
In this section, I created a Django project inside the Django Boards application, broke down the project structure and described what each component means and does, and after creating the Django project, I started up the development server.
Related Resources
- django-admin and manage.py: Django docs
- How to deploy with ASGI: Django docs
Related Posts
Footnotes
-
I refer to pip3 here because I am working with Python 3.x. If I had been working with a version of Python < 3.x (2.x), then I would simply refer to pip. ↩
-
asgi stands for Asynchronous Server Gateway Interface. It was introduced in Python 3/Django 3, but had limited support. Full support was introduced in Django 3.1 and later. Python 3 has native syntax for handling asynchronous operations like network calls. WSGI and other synchronous standards can’t take advantage of the enhanced performance and efficiency of async. That also means WSGI can’t handle advanced protocols like WebSocket. ↩
-
wsgi stands for Web Server Gateway Interface. WSGI is a mediator responsible for conveying communication between a web server and a Python web application. It explains how the web server communicates with the app and how the app can be chained for processing a request. It’s vital for deploying a Django or Flask app. ↩