Creating the official Django Polls app Part 7
Social Share:
Friday, January 10, 2025 at 4:36 PM | 8 min read
Last modified on Saturday, July 4, 2026 at 4:27 PM
#fullstack development, #macOS, #django, #python3, #admin change list customization, #admin form, #admin interface, #search, #series, #template customization, #tutorial

Photo by David Clode on unsplash.com
Table of Contents
- Customizing the admin form
- Adding related objects
- Customizing the admin change list
- Adding search capability
- Customizing the admin look and feel
- Customizing my project’s templates
- Code associated with this post
- Customizing the admin index page
- Conclusion
- Related Resources
- Related Posts
Update (July 2026): This walkthrough was written against Django 5.1, which reached full end-of-life in December 2025 and is no longer receiving security patches. Run python -m django --version to check which version you have.
Customizing the admin form
By registering the Question model with admin.site.register(Question), Django was able to construct a default form representation.
Often, I might want to customize how the admin form looks and works. I’ll do this by telling Django the options I want when I register the object.
I can learn about how this works by reordering the fields on the edit form. I'll replace the admin.site.register(Question) line with:
from django.contrib import admin
from .models import Question, Choice

class QuestionAdmin(admin.ModelAdmin): #new
    fields = ["pub_date", "question_text"]

# Register your models here.
admin.site.register(Question, QuestionAdmin)
admin.site.register(Choice)
I’ll follow this pattern to create a model admin class, then pass it as the second argument to admin.site.register() any time I need to change the admin options for a model.
This particular change above makes the “Publication date” come before the “Question” field:
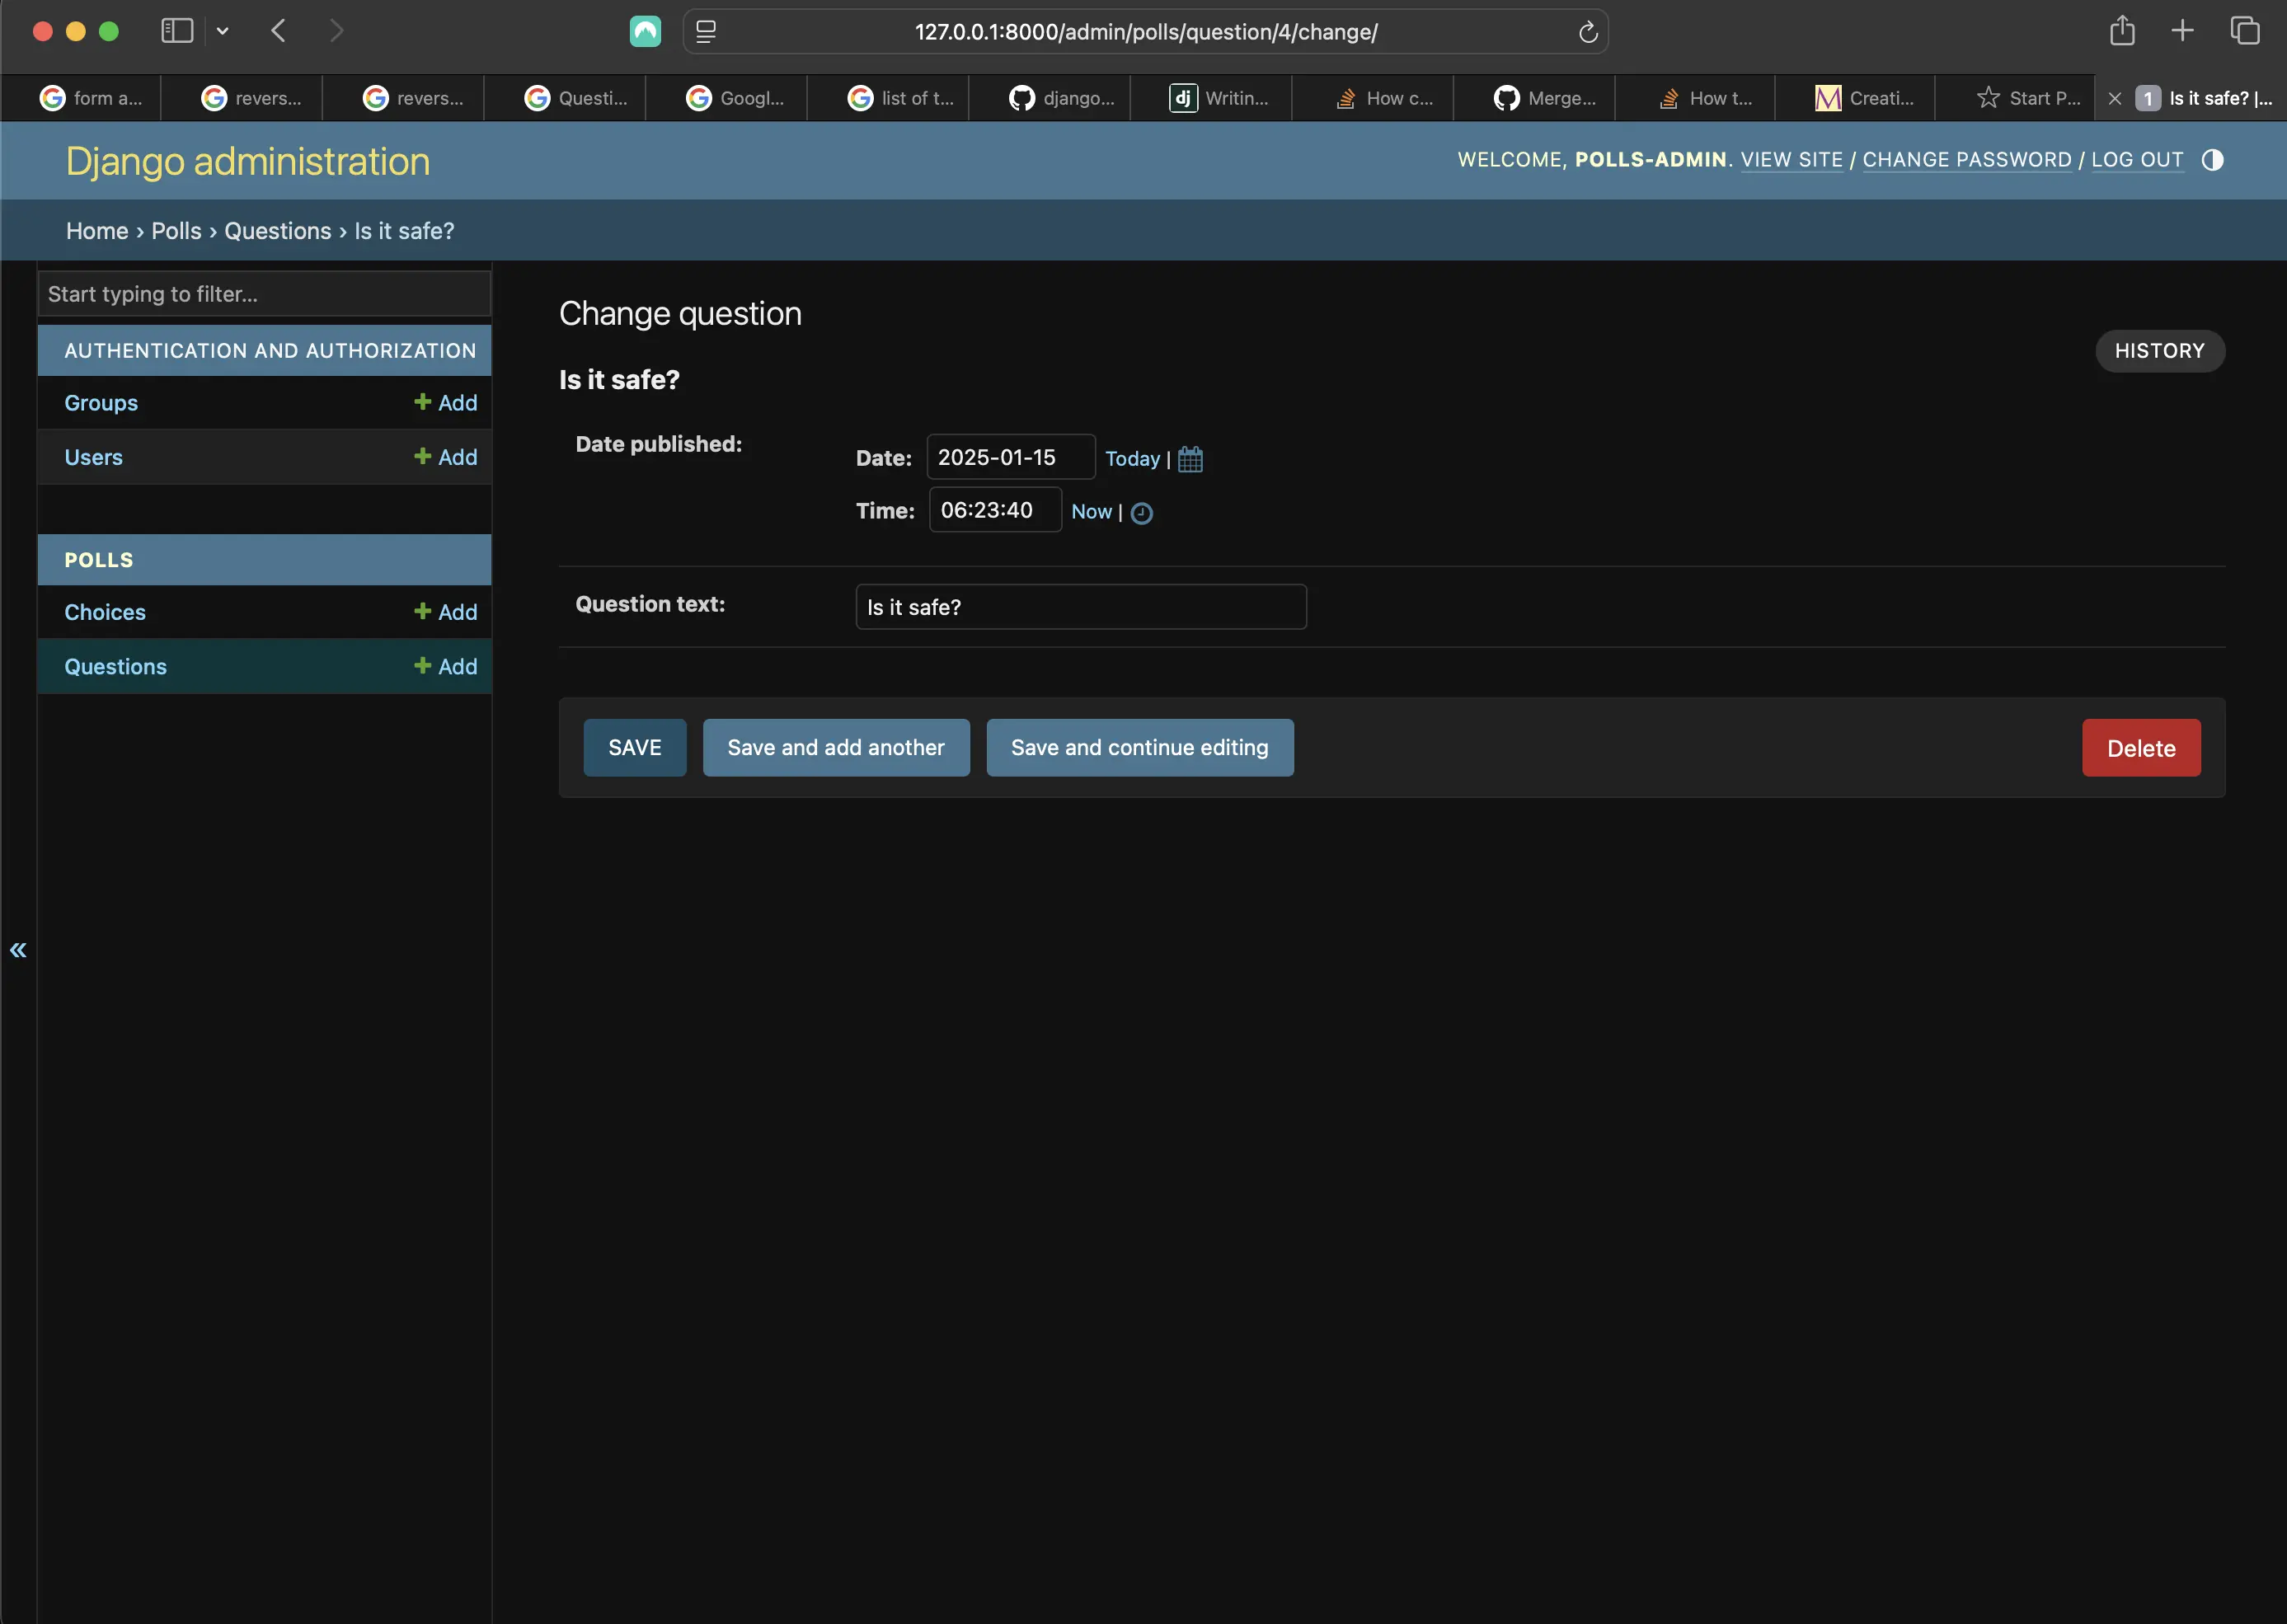
Customizing the Question admin form
This doesn't seem like much with only two fields, but for admin forms with dozens of fields, choosing an intuitive order is important for UI/UX.
Adding related objects
I have my Question admin page, and a Question has multiple Choices. But the admin page doesn't display choices by default, until I add Choice to admin.py, at which point my admin interface displays them.
There are two ways to add choices to admin.py. The first is to register Choice with the admin just as I did with Question:
from django.contrib import admin
from .models import Question, Choice

class QuestionAdmin(admin.ModelAdmin):
    fields = ["pub_date", "question_text"]

# Register your models here.
admin.site.register(Question, QuestionAdmin)
admin.site.register(Choice)
Now my admin interface looks like the following:
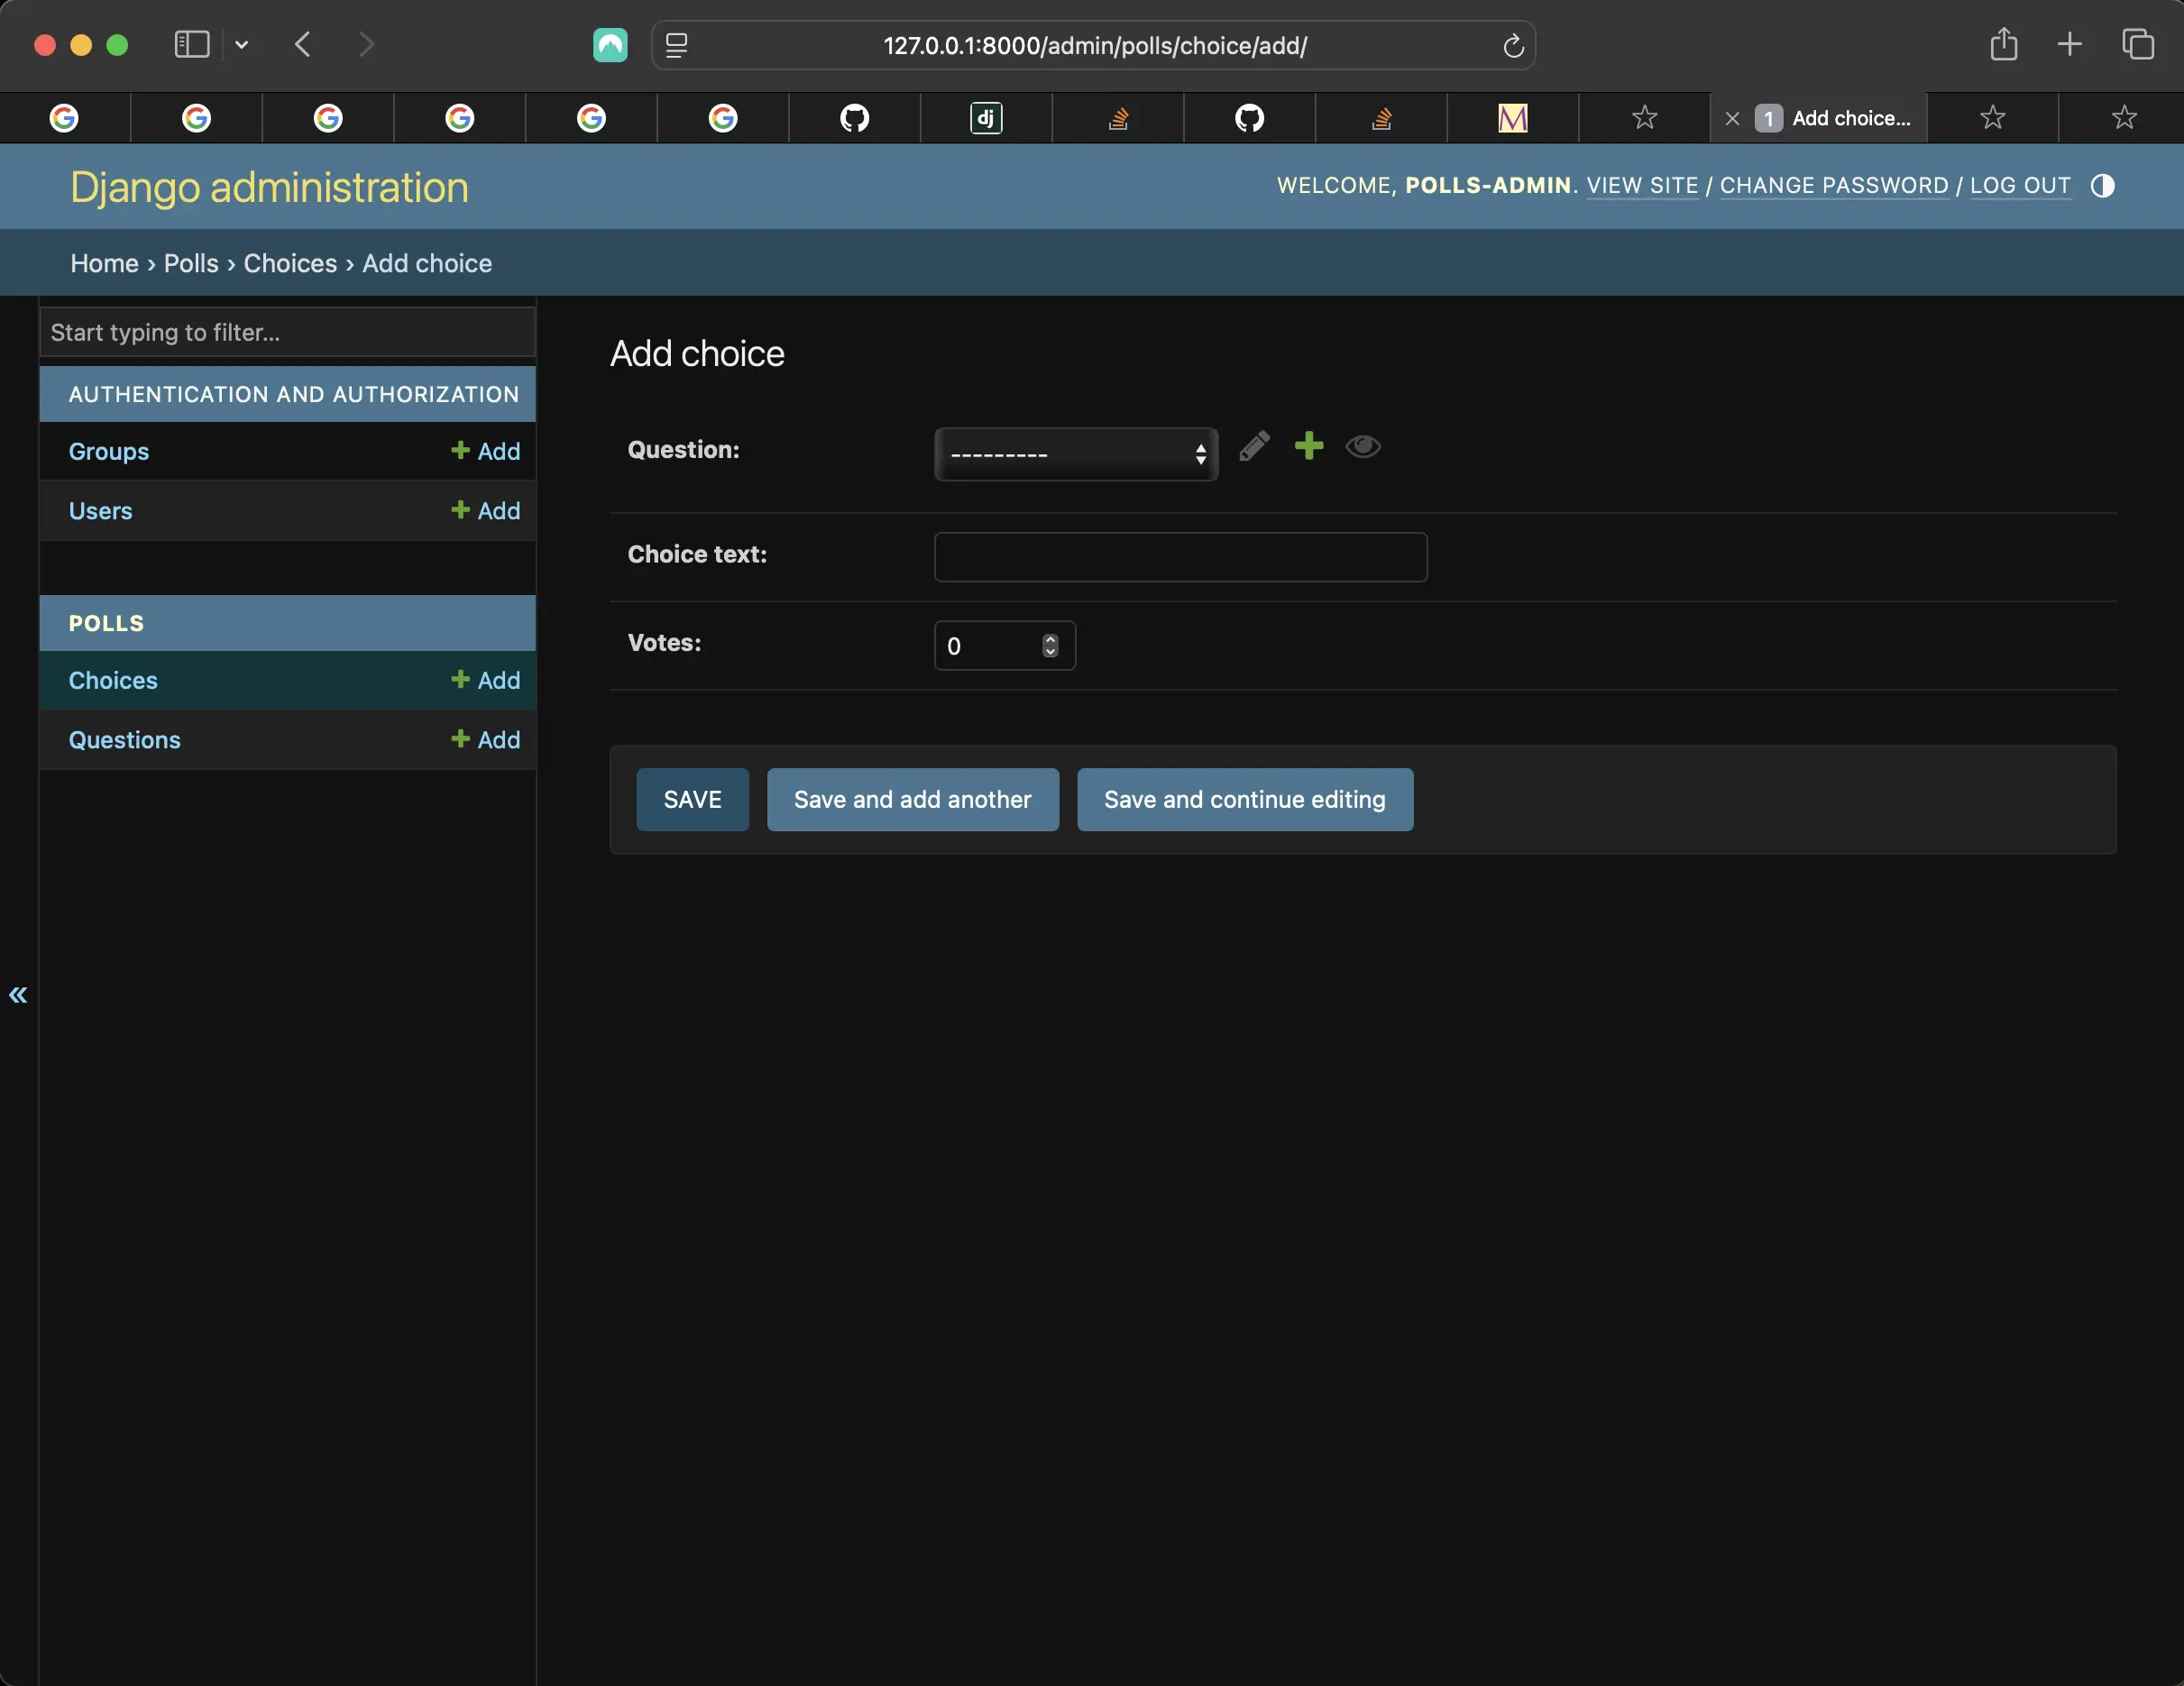
Customizing the Question and Choice in the admin interface
In the above form, the “Question” field is a select box containing every question in the database. Django knows that a ForeignKey should be represented in the admin as a <select> box. In my case, two questions exist, one of which is scheduled in the future.
I also have an “Add another question” link next to “Question.” Every object with a ForeignKey relationship to another gets this as well. When I click “Add another question”, I get a popup window with an “Add question” form. If I add a question in that window and click “Save”, Django will save the question to the database and dynamically add it as the selected choice on the “Add choice” form appearing in the screenshot above.
But this is an inefficient way of adding Choice objects. It would be better if I could add multiple Choices directly when I create the Question object. I can make that happen.
First I remove the register() call for the Choice model. Then, I edit the Question registration code in the following way:
from django.contrib import admin
from .models import Question, Choice

class ChoiceInline(admin.StackedInline):
    model = Choice
    extra = 3


class QuestionAdmin(admin.ModelAdmin):
    fieldsets = [
        (None, {"fields": ["question_text"]}),
        ("Date information", {"fields": ["pub_date"], "classes": ["collapse"]}),
    ]
    inlines = [ChoiceInline]


admin.site.register(Question, QuestionAdmin)
The above tells Django that “Choice objects are edited on the Question admin page. By default, provide enough fields for three choices.”
Now the "Add question" page looks like the following:
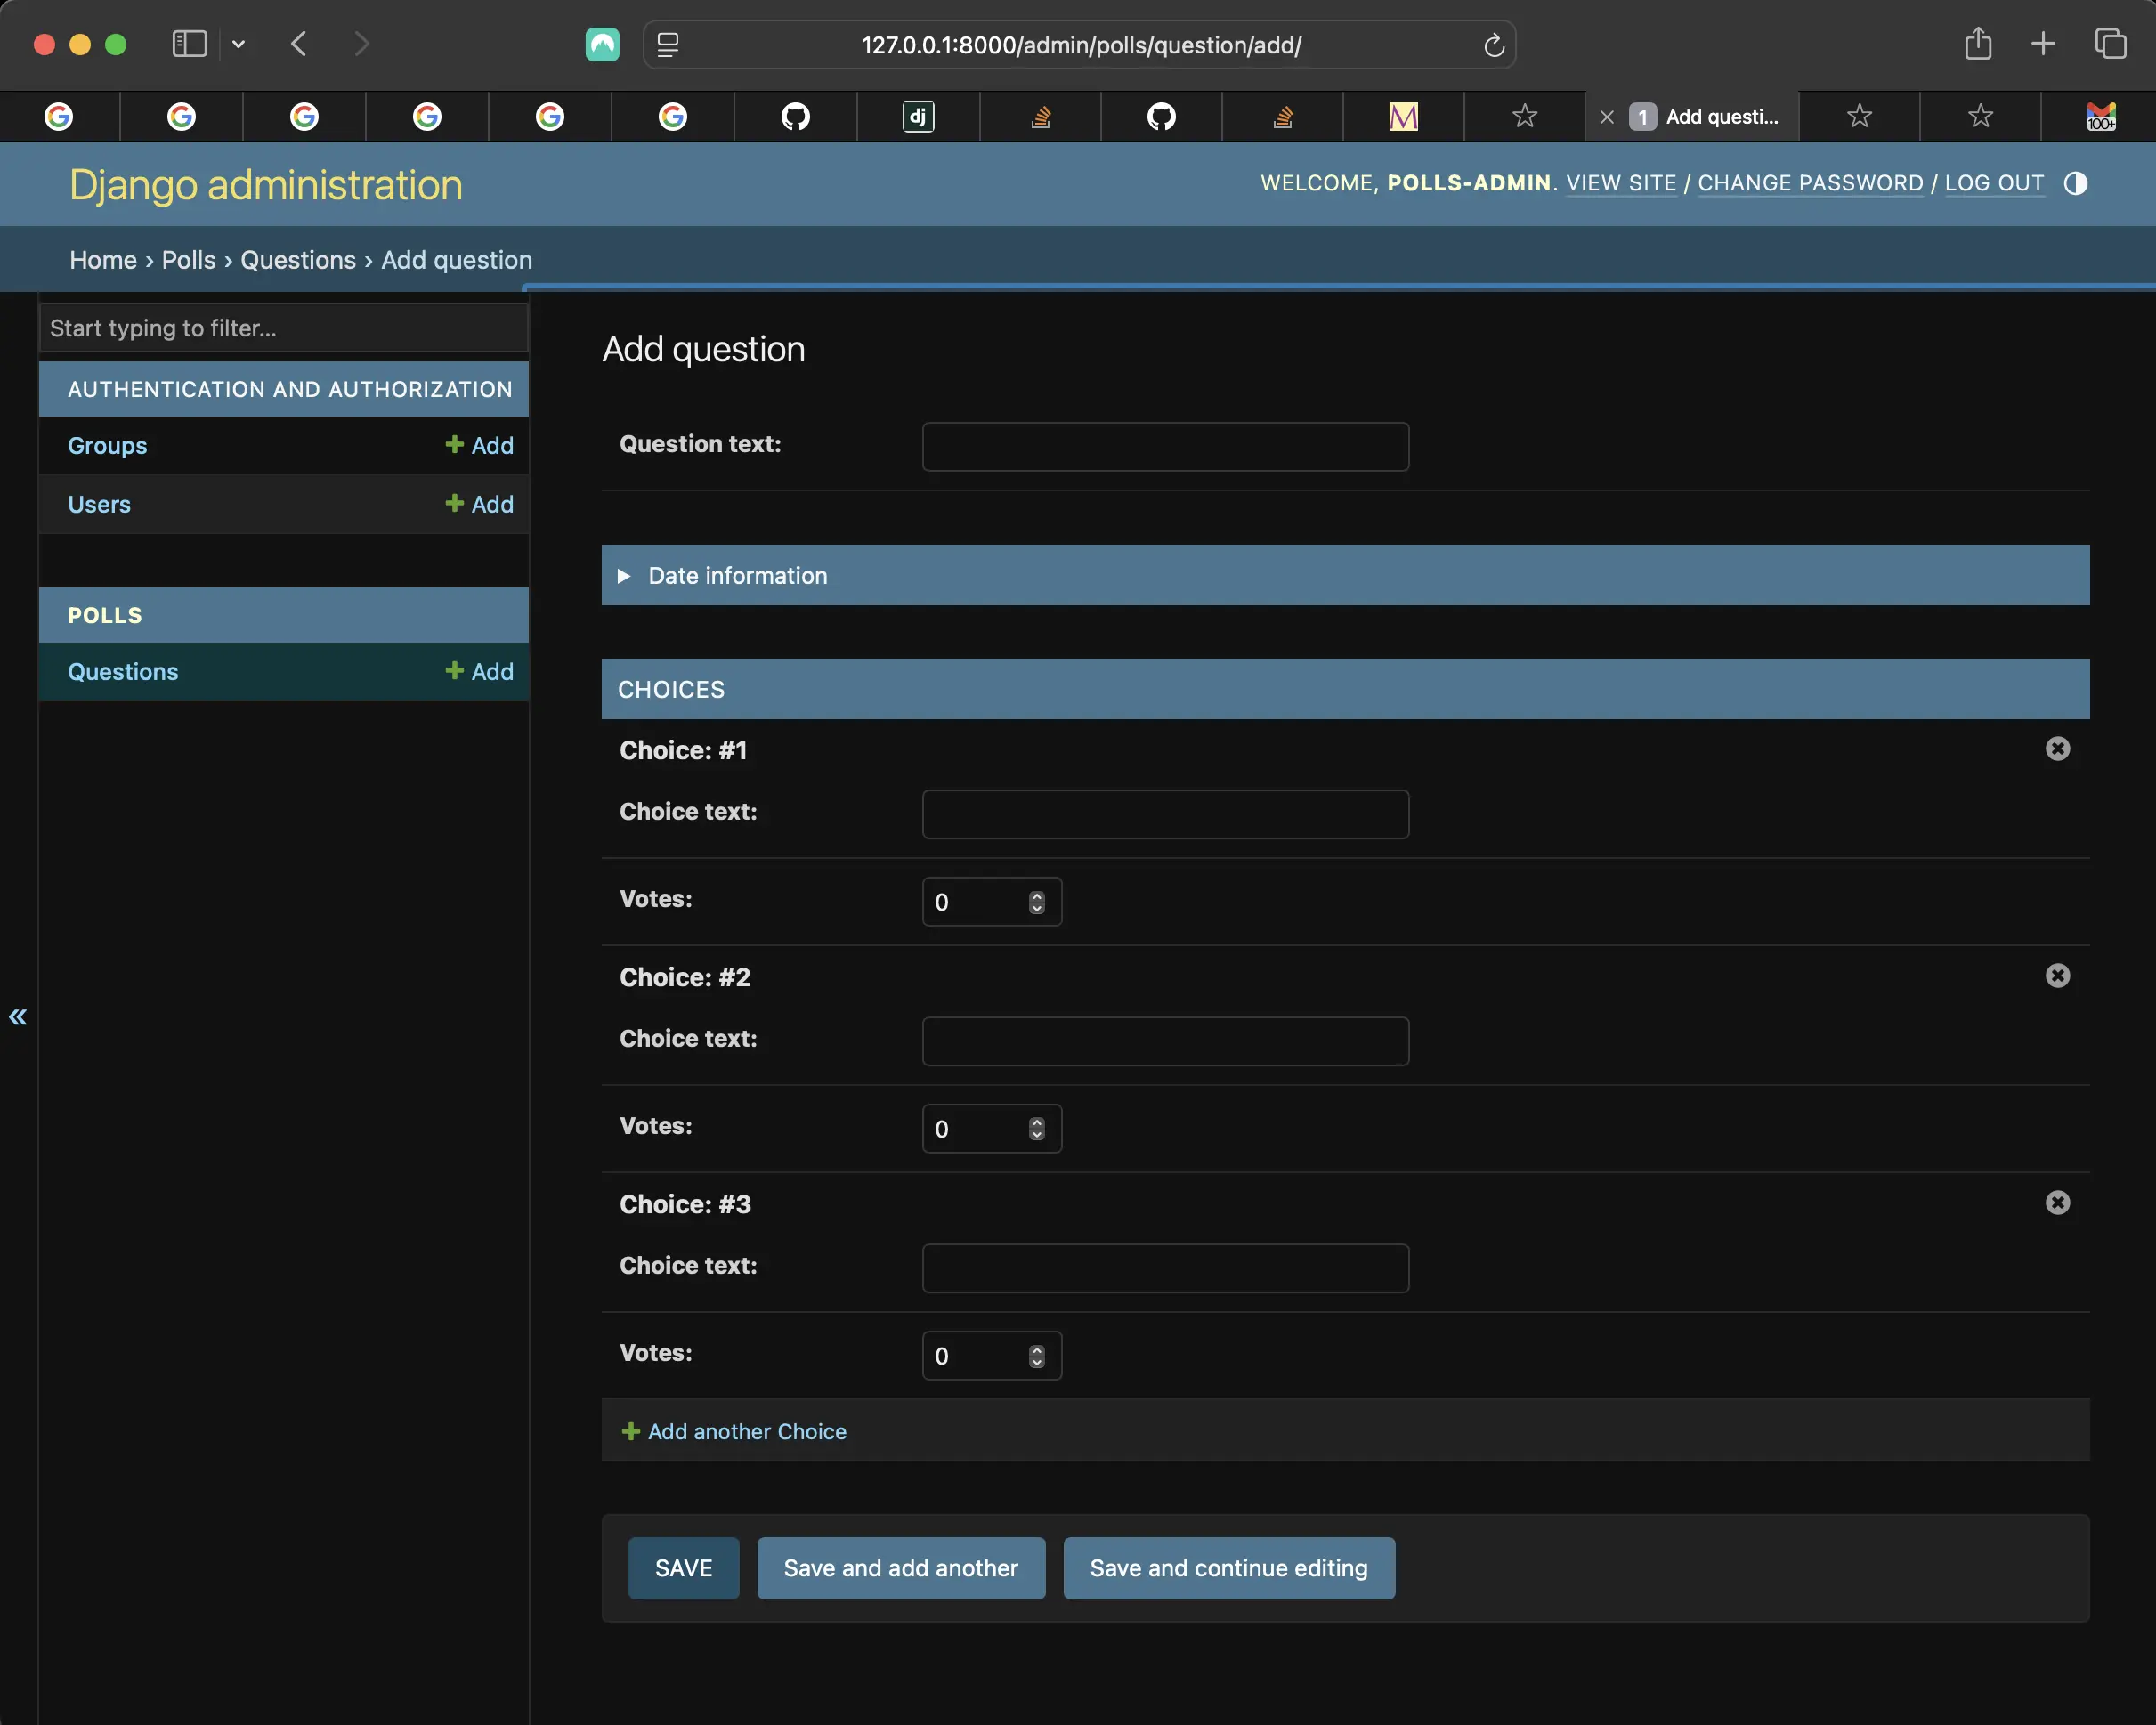
Choice objects edited on the Question admin page
There are three slots for related Choices as specified by extra, and each time I come back to the “Change” page (/change/) for an already-created object, I get another three extra slots.
At the end of the three current slots, I will find an “Add another Choice” link. If I click on it, a new slot will be added. If I want to remove the added slot, I can click on the "X" to the top right of the added slot. The below shows an added slot:

Adding a slot
There is one problem here. It takes a lot of screen space to display all the fields for entering related Choice objects. Django solves this by offering a tabular way of displaying inline related objects. To use it, I change the ChoiceInline declaration to the following:
from django.contrib import admin
from .models import Question, Choice

class ChoiceInline(admin.TabularInline): # new
    model = Choice
    extra = 3


class QuestionAdmin(admin.ModelAdmin):
    fieldsets = [
        (None, {"fields": ["question_text"]}),
        ("Date information", {"fields": ["pub_date"], "classes": ["collapse"]}),
    ]
    inlines = [ChoiceInline]


admin.site.register(Question, QuestionAdmin)
When I use TabularInline (instead of StackedInline), related objects are displayed in a more compact, tabular format:

Tabular ChoiceInline
There is an extra “Delete?” column that allows removing rows added using the “Add another Choice” button and rows that have already been saved.
Customizing the admin change list
Next, I'll tweak the “change list” page. That's the one that displays all the questions in the database.
This is what it looks like right now:

Current status of the Question change list page
By default, Django displays the str() of each object. But sometimes it would be more helpful to display individual fields. To do that, I use the list_display admin option, which is a list of field names to display as columns on the (Question) change list page for an object:
# polls/admin.py
...
class QuestionAdmin(admin.ModelAdmin):
    fieldsets = [
        (None, {"fields": ["question_text"]}),
        ("Date information", {"fields": ["pub_date"], "classes": ["collapse"]}),
    ]
    inlines = [ChoiceInline]
    list_display = ["question_text", "pub_date"]
    ...
I'll also include the recently_published() method from Tutorial 2:
# polls/admin.py
class QuestionAdmin(admin.ModelAdmin):
    fieldsets = [
        (None, {"fields": ["question_text"]}),
        ("Date information", {"fields": ["pub_date"], "classes": ["collapse"]}),
    ]
    inlines = [ChoiceInline]
    list_display = ["question_text", "pub_date", "recently_published"]
Now the question change list page looks like the following:

Result of adding recently_published to list_display
I can click on the column headers to sort by those values, except in the case of the recently_published header. That's because sorting by the output of an arbitrary method is not supported.
The column header for recently_published is, by default, the name of the method (with underscores replaced by spaces), and each line contains the string representation of the output.
I can improve upon list_display by using the display() decorator on that method, which extends the polls/models.py file that was created in Tutorial 2:
# polls/models.py
...
from django.contrib import admin # new

class Question(models.Model):
    question_text = models.CharField(max_length=200)
    pub_date = models.DateTimeField("date published")  # human readable name

    @admin.display( # new
        boolean=True,
        ordering="pub_date",
        description="Published recently?",
    )

    def recently_published(self):
        now = timezone.now()
        return now - datetime.timedelta(days=1) <= self.pub_date <= now

    def __str__(self):
        return self.question_text
...
To learn more about the properties configurable via the decorator, please visit list_display in the Django documentation.
Next, I edit my polls/admin.py file again and add an improvement to the Question change list page. I add filters using the list_filter. I add the following line to QuestionAdmin:
# polls/admin.py
class QuestionAdmin(admin.ModelAdmin):
    fieldsets = [
        (None, {"fields": ["question_text"]}),
        ("Date information", {"fields": ["pub_date"], "classes": ["collapse"]}),
    ]
    inlines = [ChoiceInline]
    list_display = ["question_text", "pub_date", "recently_published"]
    list_filter = ["pub_date"] # new
This adds a “Filter” sidebar that lets people filter the change list by the pub_date field:

Adding pub_date list_filter
The type of filter displayed depends on the type of field I'm filtering on. Because pub_date is a DateTimeField, Django knows to give appropriate filter options: “Any date”, “Today”, “Past 7 days”, “This month”, “This year”.
Adding search capability
I'll add some search capability to polls/admin.py:
# polls/admin.py
...
class QuestionAdmin(admin.ModelAdmin):
    fieldsets = [
        (None, {"fields": ["question_text"]}),
        ("Date information", {"fields": ["pub_date"], "classes": ["collapse"]}),
    ]
    inlines = [ChoiceInline]
    list_display = ["question_text", "pub_date", "recently_published"]
    list_filter = ["pub_date"]
    search_fields = ["question_text"] # new
    ...
The above adds a search box at the top of the change list. When somebody enters search terms, Django will search the question_text field. I can use as many fields as I’d like. But because it uses a LIKE query behind the scenes, limiting the number of search fields to a reasonable number will make it easier for my database to do the search.
Change lists also provide me with pagination. The default is to display 100 items per page. Change list pagination, search boxes, filters, date-hierarchies and column-header-ordering work together well.
Customizing the admin look and feel
Having “Django administration” at the top of each admin page is not helpful. It’s just placeholder text.
I can change it using Django’s template system. Django powers its own admin interface, and those interfaces use Django’s template system.
Customizing my project’s templates
Next, I create a templates directory in my django_polls directory. Templates can live anywhere on my filesystem that Django can access. Django runs as whatever user my server runs. However, keeping my templates within the project is a good convention to follow.
Next, I open my settings.py file (django-polls/django_polls/settings.py) and add a DIRS option in the TEMPLATES setting:
TEMPLATES = [
    {
        "BACKEND": "django.template.backends.django.DjangoTemplates",
        "DIRS": [BASE_DIR / "templates"],
        "APP_DIRS": True,
        "OPTIONS": {
            "context_processors": [
                "django.template.context_processors.debug",
                "django.template.context_processors.request",
                "django.contrib.auth.context_processors.auth",
                "django.contrib.messages.context_processors.messages",
            ],
        },
    },
]
DIRS is a list of filesystem directories to check when loading Django templates. It’s a search path.
As per the Django tutorial part 7 regarding organizing templates,
Just like the static files, we could have all our templates together, in one big templates directory, and it would work perfectly well. However, templates that belong to a particular application should be placed in that application’s template directory (e.g. polls/templates) rather than the project’s (templates). We’ll discuss in more detail in the reusable apps tutorial why we do this.
Next, I create a directory called admin inside templates, and copy the template admin/base_site.html from within the default Django admin template directory in the source code of Django itself (django/contrib/admin/templates) into that directory.
If I have difficulty finding where the Django source files are located on my system, I can run the following command in Terminal:
python -c "import django; print(django.__path__)"
Then, I edit the file and replace {{ site_header|default:_('Django administration') }} (including the curly braces) with my own site’s name. I should end up with something like the following:
<!-- django-polls/templates/admin/base_site.html -->
{% extends "admin/base.html" %}
{% block title %}
    {% if subtitle %}{{ subtitle }} |{% endif %}
    {{ title }} | {{ site_title|default:_("Django Polls Site Admin") }}
{% endblock title %}
{% block branding %}
    <div id="site-name">
        <a href="{% url 'admin:index' %}">Django Polls Site Admin</a>
    </div>
    {% if user.is_anonymous %}
        {% include "admin/color_theme_toggle.html" %}
    {% endif %}
{% endblock branding %}
{% block nav-global %}
{% endblock nav-global %}
Which results in the following:

Overriding Django admin base_site.html
Code associated with this post
To view the code associated with this post, please visit 397e660.
There's an admin customization worth covering before I conclude this post.
Customizing the admin index page
I could also customize the look and feel of the Django admin index page. I may want to make significant changes to the layout. After all, the index is probably the most important page of the admin, and it should be easy to use.
The template to customize is admin/index.html. I should do the same as with admin/base_site.html. I copy it from the default directory to my custom template directory. I edit the file, and I see it uses a template variable called app_list. That variable contains every installed Django app. Instead of using that, I can hard-code links to object-specific admin pages in whatever way I think works best.
I took the admin/index.html from Django's repository on GitHub (like provided earlier) and copied and pasted the contents into my own templates/admin/index.html where my base_site.html also resides:
<!-- templates/admin/index.html -->
{% extends "admin/base_site.html" %}
{% load i18n static %}
{% block extrastyle %}
    {{ block.super }}
    <link rel="stylesheet" href="{% static "admin/css/dashboard.css" %}">
{% endblock %}
{% block coltype %}
    colMS
{% endblock coltype %}
{% block bodyclass %}
    {{ block.super }} dashboard
{% endblock bodyclass %}
{% block nav-breadcrumbs %}{% endblock %}
{% block nav-sidebar %}{% endblock %}
{% block content %}
    <div id="content-main">{% include "admin/app_list.html" with app_list=app_list show_changelinks=True %}</div>
{% endblock content %}
{% block sidebar %}
    <div id="content-related">
        <div class="module" id="recent-actions-module">
            <h2>{% translate "Recent actions" %}</h2>
            <h3>{% translate "My actions" %}</h3>
            {% load log %}
            {% get_admin_log 10 as admin_log for_user user %}
            {% if not admin_log %}
                <p>{% translate 'None available' %}</p>
            {% else %}
                <ul class="actionlist">
                    {% for entry in admin_log %}
                        <li class="{% if entry.is_addition %}addlink{% endif %}{% if entry.is_change %}changelink{% endif %}{% if entry.is_deletion %}deletelink{% endif %}">
                            <span class="visually-hidden">
                                {% if entry.is_addition %}
                                    {% translate "Added:" %}
                                {% elif entry.is_change %}
                                    {% translate "Changed:" %}
                                {% elif entry.is_deletion %}
                                    {% translate "Deleted:" %}
                                {% endif %}
                            </span>
                            {% if entry.is_deletion or not entry.get_admin_url %}
                                {{ entry.object_repr }}
                            {% else %}
                                <a href="{{ entry.get_admin_url }}">{{ entry.object_repr }}</a>
                            {% endif %}
                            <br>
                            {% if entry.content_type %}
                                <span class="mini quiet">
                                    {% filter capfirst %}
                                        {{ entry.content_type.name }}
                                    {% endfilter %}
                                </span>
                            {% else %}
                                <span class="mini quiet">{% translate "Unknown content" %}</span>
                            {% endif %}
                        </li>
                    {% endfor %}
                </ul>
            {% endif %}
        </div>
    </div>
{% endblock sidebar %}
I have to examine this more carefully and get to know what is what, but I will end up customizing it in some way!
Code associated with customizing the admin index page
To view the code associated with customizing the admin index page, please visit 0998605.
Conclusion
In this section, I customized the Question admin form, added Choice-related objects to the admin form, customized the admin change list, added search capability to the admin interface, customized the admin look and feel, and customized my project's templates.
Related Resources
- Writing your first Django app, part 7: Django documentation
- The Django admin site: Django documentation
Related Posts
- Creating the official Django Polls app table of contents: mariadcampbell.com